Procedure of liquid limit test
1. Adjust the height of drop of the cup so that the point on the cup that comes in contact with the base rises to a height of 10 ± 0.2 mm at it’s maximum range. The block at the end of the grooving tool handle is a 10 mm gage. Place the 10 mm block edge at the worn spot on the base. Rotate the handle – there should be no discernible click or bump of the cup.
2. Before starting this test, remove approximately 20 g of material and place it on the glass plate to be used for the plastic limit test.
(3.) Place a portion of the prepared sample in the cup of the liquid limit device at the point where the cup rests on the base, squeeze it down, and spread it into the cup to a depth of about 10 mm at its deepest point, tapering to form an approximately horizontal surface. Take care to eliminate air bubbles from soil pat, but form the pat with as few strokes as possible. Heap the unused soil on the glass plate and cover with inverted storage dish or a wet towel.
(4.) Form a groove in the soil pat by drawing the tool, beveled edge, forward through the soil on a line joining the highest point to the lowest point on the rim of the cup. When cutting the groove, hold grooving tool against the surface of the cup and draw in an arc maintaining the tool perpendicular to the surface of the cup throughout its movement

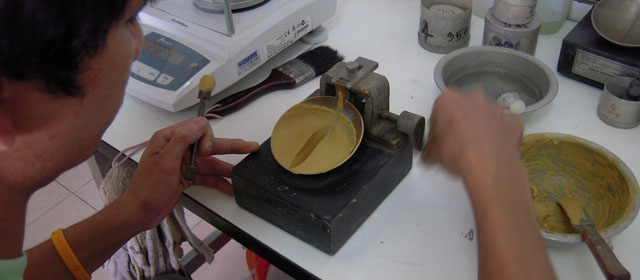
liquid limit test
In soils where a groove cannot be made in one stroke without tearing the soil cut the groove with several strokes of the grooving tool. Alternately, cut the groove to slightly less than required dimensions with a spatula and use the grooving tool to bring the groove to final dimensions. Exercise extreme care to prevent sliding the soil pat relative to surface or the cup.
(5.) Verify that no crumbs of soil are present on the base or the underside of the cup. Lift and drop the cup by turning the crank at a rate of 1.9 to 2.1 drops per second until the two halves of the soil pat come in contact a the bottom of the groove along a distance of 13 mm (1/2 in.) (see Figure 6). Use the end of the grooving tool or a scale too verify that the groove has closed 13 mm (1/2 in.).
(6.) Verify that an air bubble has not caused premature closing of the groove by observing that both sides of the groove have flowed together with approximately the same shape. If a bubble has caused premature closing of the groove, reform the soil in the cup by adding a small amount of soil to make up for that lost in the grooving operation and repeat (3.) through (5.). If the soil slides on the surface of the cup, repeat (3.) through (5.) at a higher water contents. If, after several trials at successively higher water contents, the soil pat continues to slide in the cup or if the number of blows required to close the groove is always less than 25, record that the liquid limit could not be determined, and report the soil as non-plastic without performing the plastic limit test.
(7.) Record the number of drops (N) required to close the groove. Remove a slice of soil approximately the width of the spatula extending from edge to edge of the soil cake at right angles to the groove and including that portion of the groove in which the soil flowed together, place in a weighed container, and cover.
(8.) Return the soil remaining in the cup to the glass plate. Wash and dry the cup and grooving tool and reattach the cup to the carriage in preparation for next trial.
9. Remix the entire soil specimen on the glass plate to reduce the water content of the soil and increase the number of blows required to close the groove. Repeat (3.) through (8.) for at least three additional trials producing successively greater numbers of blows to close the groove. Preferably, two trials should produce closure in blows or less, and two trials should produce closure in 25 blows or more.
10. Determine the water content (Wn) of the soil specimen from each trial in accordance with the procedure of water content. Make all weighings on the same balance. Initial weighings should be performed immediately after completion of the test. If the test is to be interrupted for more about 15 min, the specimens already obtained should be weighed at the time of the interruption.
Calculations
1. Plot the relationship between the water content, Wn, and the corresponding number of drops, N, of the cup on a semilogarithmic graph with the water content as ordinates on the logarithmic scale. Draw the best straight line through the four or more plotted
2 Take the water content corresponding to the intersection of the line with the 25-drop abscissa as the liquid limit of soil. Computational methods may be substituted for the graphical method for fitting a straight line to the data and determining the liquid limit.
SOURCE : EM 110-2-1906 Appendix III Change 2 20 Aug 86 Laboratory Soils Testing : U.S. Army Corps of Engineer Manual Em 1110-2-1906
 Previous Post
 Next Post